Refer friends and Earn a €100 off Discount Code. Learn More

Free Shipping on orders over €99 & 2-Year Warranty.

Pièces et accessoires

(32 produits)
Voir en

  • PEI Glass Plate for Snapmaker J1/J1s

    €56,99 EUR
    Voir les détails
  • Extension Cord for Rotary Module (1.5m)

    €8,99 EUR
    En stock
    Voir les détails
  • Toolhead Cable for Snapmaker 2.0

    €6,99 EUR
    En stock
    Voir les détails
  • Replacement Kit for Dual Extrusion Module

    €39,00 EUR
    Voir les détails
  • Snapmaker J1 Print Cooling Fan Upgrade Kit

    €69,00 EUR
    Voir les détails
  • Limit switch and filament runout sensor kit for Snapmaker 2.0

    €3,00 EUR
    Voir les détails
  • PCBA for Snapmaker 2.0 3D Printing Module

    €18,00 EUR
    Voir les détails
  • Heated bed-A350/A350T/F350

    €59,00 EUR
    Stock faible
    Voir les détails
  • Voir les détails
  • DC power cable for Snapmaker 2.0

    €5,00 EUR
    Voir les détails
  • FFC cable for Snapmaker J1/J1s

    €4,00 EUR
    En stock
    Voir les détails
  • Steel strip kit for A350/A350T/F350 Linear Module

    €9,00 EUR
    Voir les détails
  • Arched fixture kit for Snapmaker 2.0

    €16,00 EUR
    Stock très faible
    Voir les détails
  • Support platform-A350/A350T/F350

    €39,00 EUR
    Stock faible
    Voir les détails
  • Laser lens protector for 10W Laser Module

    €10,00 EUR
    Voir les détails

How user-friendly is the new generation 3-in-1 3D printer?

The new generation 3-in-1 3D printer, like the Snapmaker 2.0, is designed to be user-friendly and easy to operate for both beginners and experienced users.

One of the most user-friendly features of the new generation 3-in-1 3D printer is its touchscreen interface, which provides a simple and intuitive way to control the machine. The touch screen allows users to access all the functions and settings of the printer, including the print bed leveling system, filament loading and unloading, speed adjusting, and project management.

The new generation 3-in-1 3D printer also comes with user-friendly software called Snapmaker Luban, which allows users to create 3D models, slice them, and prepare them for printing. The software has a simple and intuitive interface that makes it easy for users to design and print their own creations in high precision.

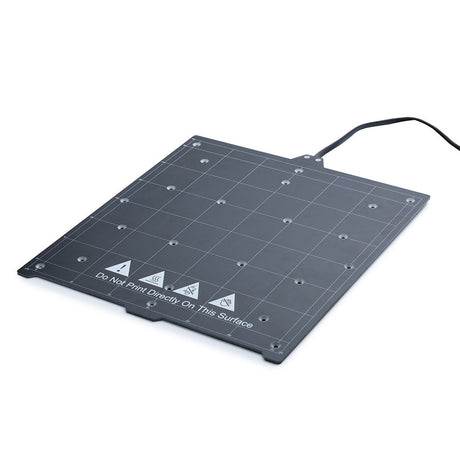
Additionally, the new generation 3-in-1 3D printer has an auto-leveling system that helps ensure that the print bed is level and the first layer of the print adheres properly. This feature reduces the need for manual leveling and makes the printing process more reliable and consistent.

Overall, the new generation 3-in-1 3D printer is designed with the user in mind, with features and tools that make it easy to use and produce high-quality prints.

How can you optimize your printing settings and workflows to take advantage of the different module products, such as adjusting laser power or CNC toolpaths?

Optimizing printing settings and workflows for the Snapmaker module products can help users take full advantage of the machine's capabilities and produce high-quality results. Here are some tips for optimizing printing settings and workflows with the different module products:

1. CNC Module: When using the CNC module, users should consider the material they are cutting and adjust the spindle speed and cutting depth accordingly. Additionally, users should experiment with different tool paths to achieve the desired level of precision and surface finish.

2. Laser Module: Users should adjust the laser power and speed settings based on the material they are cutting or engraving. For example, a higher laser power may be needed for cutting thicker materials, while a lower power may be sufficient for engraving on a softer material. Users can also experiment with different laser paths to achieve the desired level of detail.

3. 3D Printing Module: When 3D printing, users should optimize settings such as layer height, infill density, and print speed based on the material they are using and the desired quality of the final product. Additionally, users can experiment with different printing temperatures and fan speeds to achieve the desired level of adhesion and finish.

To streamline workflows, users can also take advantage of the Snapmaker Luban software, which allows them to manage projects and switch between different module products seamlessly. The software also provides users with advanced features such as layer-by-layer preview, model repair, and support generation, which can help optimize printing settings and workflows.

How can you combine multiple module products to create more complex or customized projects, such as printing and engraving on the same object?

Combining multiple Snapmaker module products can help users create more complex and customized projects. Here are some tips for combining, for example, 3D printing and laser engraving:

Customized phone cases: 3D print a phone case and then use the laser engraver to add a personalized design or message.
Jewelry: 3D print a jewelry piece and then use the laser engraver to add intricate designs or patterns.
Decorative boxes: 3D print a decorative box and then use the laser engraver to add intricate designs or patterns on the lid.
Keychains: 3D print a keychain and then use the laser engraver to add a personalized design or message.
Cutting boards: 3D print a cutting board and then use the laser engraver to add a custom design or monogram.
Coasters: 3D print a coaster and then use the laser engraver to add a custom design or message.
Decorative signs: 3D print a sign and then use the laser engraver to add a custom design or message.
Ornaments: 3D print an ornament and then use the laser engraver to add a custom design or message.
These are just a few ideas to get started. With a little creativity, the possibilities for combining 3D printing and laser engraving are endless.

Comparer /4

Chargement...